Saturday, November 30, 2013

Adraki lasooni methi

Methi (fenugreek leaves) is in abundance now that the winter is here. Adraki lasooni methi (ginger garlic flavored methi) is at the very top of my list while preparing methi. I ate it for the first time couple of years ago (when my mother in law made it) and I fell in love with the taste.
        Although, it is called adraki lasooni methi, the use of onions along with adrak (ginger) and lasoon (garlic) is just perfect.


Follow right to left.


Ingredients:
1 big bunch methi leaves, separated from stems and chopped
1 large onion, julienne sliced
1 tb spoon, chopped ginger
5-6 big cloves garlic, chopped
2 tea sp oil
1 tea sp mustard seeds
1/2 tea sp each asafoetida,turmeric and red chili powder
salt to taste

Method:
Heat pan on medium high heat. Add 1 tea spoon oil,sliced onions, chopped ginger and garlic. Saute until onions turn brown, for about 8 minutes. Keep stirring occasionally to prevent the onions from burning. Set aside to cool down. Once it cools, grind the mixture to turn into the rough paste.
         In the same pan, 1 tea spoon oil. Add mustard seeds and let them crackle. Then, add asafoetida,turmeric and red chili powder and fry until fragrant (just for 30 seconds). Add onions,ginge and garlic paste. Add chopped methi leaves and mix everything together. Cover and cook for 5-8 minutes on low heat, or until methi is cooked through. Add salt to taste and mix well. Remove from heat. Enjoy with roti/rice/naan even Bhakri!
         

Tuesday, October 22, 2013

Aluchi Wadi/Patra

Alu chi wadi or Patra is made from colocasia leaves. Beautifully shaped leaves resemble 'an elephant ear', a common name for colocasia leaves. Alu wadis can be steamed and stored in advance and fried as needed.A great side dish or in my case just a snack!


Follow from left to right.

Ingredients:
6-8 alu chi pane (colocasia leaves)
1 cup gram flour
1 tea sp cayenne pepper
2-3 tb spoon grated jaggery
1/4-1/3 cup tamarind pulp (required to remove raphides, a throat irritant)
salt to taste
2-3 tb. spoon water

Method:
Wash the leaves and pat dry. Colocasia leaves have lot of stems running throughout the leaf and so it is hard to roll them. To make it easier later to roll, take a rolling pin and gently roll each leaf to flatten any big stems. Make sure not to tear the leaf.
         In a mixing bowl mix together gram flour, salt,cayenne pepper,jaggery and tamarind pulp. Add water little by little to make a thin paste. Paste shouldn't be runny but should wet enough to apply a thin layering on the leaf. The above given ingredients make 2 rolls (3-4 leaves each.) 
        Take the biggest leaf and lay it flat on the surface (preferably covered with plastic foil for an easy clean up later). Bright green side of the leaf should always be facing down. Apply thin layer of the gram flour mixture on the leaf. Take the second biggest leaf and keep it on top of the first leaf (now with the layer of the paste), again making sure bright green side is facing down. Apply another layer of the paste and repeat the process for 3-4 leaves in total. Its time to roll now. Follow the collage above for procedure of rolling. Each fold gets a coating of the gram flour mixture. Roll tightly to ensure it doesn't disintegrate later. Repeat this process to make another roll with 4 remaining leaves. I never take more than 4 leaves to make these as it gets harder to roll with more leaves. You may tie the roll with kitchen twine to make sure it doesn't fall apart while steaming.
    Steam for 10 minutes and remove from the heat. Let the rolls cool completely before cutting into pieces. Once cooled, cut into 1/2 inch thick pieces and deep fry. Serve immediately as the wadis have tendency to get soggy if kept for a longer time after frying.
   If you don't want to deep fry - heat 2 tablespoons oil in skillet on medium high heat. Add mustered seeds and let them crackle. Add cut pieces and shallow fry. Optional garnish - 2 tb spoons each chopped cilantro and shredded coconut

Note:
Colocasia leaves are known to cause an allergic reaction to the throat. Its more like an irritation. And so to cure that, you must have tamarind pulp in the recipe. I have an idea about the leaves that I grow, and so the quantity of tamarind mentioned in the recipe is suitable to me. If making this for the first time, add little more pulp just to be extra careful and adjust jaggery according to your taste.Even after this,if you have irritated throat, eat couple of tablespoon yogurt and the irritation will go away!


Thursday, October 10, 2013

Dadpe Pohe

Dadpe pohe is classic Maharashtiran dish. It is my go to meal/snack of all times. Very quick to make and does not require any fancy ingredients.


Ingredients:
1 and half cups patal pohe
1 medium tomato , chopped
1/3 medium onion, chopped
2-3 tablespoons freshly grated coconut
2 tablespoons chopped cilantro
1 tea spoon sugar
salt to taste

For tempering:
1 tablespoon oil
1/4 tea spoon mustered seeds
pinch of asafoetida
1/4 tea spoon turmeric powder
1 chilli, diced into pieces
2 tablespoons peanuts

Method:
In a mixing bowl, mix together tomato,onion and salt and keep aside for 10 minutes. Salt helps to release the moisture from onions and tomatoes. Add pohe,grated coconut,sugar and cilantro and mix everything well. The idea is to soak pohe in the moisture from tomatoes and onions. Traditionally , coconut water was used to moisten pohe. If you don't have it, the moisture from tomatoes and onions is enough. Add 2-3 tablespoons water if needed. Keep aside for 15 minutes.
             To prepare the tempering, heat oil onto medium heat. Add mustered seeds and let them crackle. Add asafoetida,turmeric powder and chilies. Add peanuts and fry for couple of minutes. Add tempering to the pohe and mix well. Serve immediately with sprinkled sev on top. If you don't have sev, roasted plain urad papad crumbled into small pieces will do the trick!


Friday, September 20, 2013

Nut Brittle

Making brittle sounds daunting but it is just a matter of practice. Brittle is nothing more than 'chikki' that we find back home. Growing up ,I loved 'danyachi chikki'(peanut brittle). You can make brittle with any nuts, almonds and cashews are now my favorites.
               Once I got comfortable making a caramel, I have started making brittle more and more. It makes a great edible gift, also makes a fabulous ice cream topping!


Ingredients:
1/2 cup sugar
2 tb spoon water
pinch of salt (optional)
1/2 cup chopped nuts

Method:
First and foremost, make brittle when you have time to stand near the stove. You don't want to leave the caramel on the stove and do other things. It can go from beautiful golden color to charcoal in no time (been there done that).
    To start the caramel, take a non reactive (preferably stainless steel) pan. Heat the pan to medium-medium high heat. Add sugar and water. Stir to combine. You can stir until all the sugar is dissolved. Don't stir the sugar water mixture once it starts to boil. You can swirl the pan.
       Boil the mixture until it gets golden brown. Remove the pan from heat slightly before the desired color. Sugar will keep cooking and reach the desired color. At this point, add pinch of coarse sea salt,vanilla or any other flavoring, Stir to combine, add nuts and stir again. After this, you have to work quickly. Pour the mixture onto a baking tray lined with parchment paper. Spread as evenly as you can using a spatula. Cool completely until the caramel hardens and sets. If you are impatient like I am, stick the baking tray in freezer for 5-7 minutes or until caramel is hardened  and the brittle will be ready. Peel the brittle carefully from the parchment paper. If it is set correctly, it will come off easily. Break into pieces and store in an air tight container.
     To make an ice cream topping, grind the pieces of brittle until coarse!

Note- This makes a hard brittle. If you want to make soft brittle, once the caramel is done, add 1 tb spoon butter and mix well. Then flavorings and nuts and follow the process.
       

Wednesday, August 21, 2013

Chile Relleno

Chile Relleno is a mexican specialty.  Poblano peppers are usually used to make this. They are milder in taste and make a tasty cover for almost any stuffing. Stuff these with rice,beans,meat,cheese or even polenta. They taste equally delicious.
                    There are a few steps to the recipe like roasting,stuffing and broiling (usually deep-frying). This is a lighter version of the original Chile Relleno.


Ingredients:

4 medium size poblano peppers charred until just soft (not mushy) ,peeled

For Stuffing-
1/3 cup Polenta (cornmeal)
salt and pepper to taste
1/4 cup chopped peppers
1/2 onion chopped
1 tea sp chopped garlic
1/4 cup grated Monterey jack cheese (substitute queso fresco -delicious!)


For coating the peppers-
1/4 cup all purpose flour mixed with 2 tb spoon water (wet batter)
1/2 cup breadcrumbs,1 tb spoon parsley,salt and pepper (dry coating)

for tomato sauce-
1 and 1/2 cups chopped tomatoes
1 clove of garlic chopped
1 jalapeno pepper, seeded and chopped
half onion chopped
1 tb spoon oregano
1 tea spoon parsley
1/2 cup water
salt and pepper to taste

Method:
Start with charring the peppers. Use the oven broiler or direct heat (if you have a gas burner). To broil, pre-heat the oven on 400 F and char the peppers for 2-3 minutes on each side.Once charred from all sides, transfer them in a plastic bag and let them cool. Peel off and discard charred skin.Slit peppers in the middle lengthwise (make sure not to cut all the way through). Remove and discard seeds.
    For the stuffing, heat oil in a pan and add chopped garlic and sauté until fragrant  Add chopped onion, peppers and let them soften. Add polenta, season with salt and pepper and stir to combine. Add boiling water to the mixture slowly, stirring continuously to get rid of any lumps. Once the polenta starts to thicken, stir occasionally. Once cooked, remove from heat and let it cool down a bit.
   To make the tomato sauce, heat oil in pan. Add garlic,jalapeno pepper and saute until fragrant. Add chopped tomatoes,oregano and parsley. Add water and season with salt and pepper. Let the mixture come to boil, reduce heat to medium and keep cooking it for another 10-12 minutes.Remove from heat and set aside.
  Once the stuffing is slightly cooled, stuff the charred peppers and seal the peppers with toothpick to ensure that the stuffing doesn't come out. Dip the stuffed peppers into the wet batter and dip the coated peppers into the mixture of breadcrumbs and parsley. Transfer the coated peppers onto a baking sheet. Drizzle peppers with little oil and bake it for 8-10 minutes or until golden brown at 400 F. Remove toothpicks before serving.
     Warm the tomato sauce and serve baked peppers,hot out of the oven.

Tuesday, August 6, 2013

Green Tomato Chutney

As the summer is progressing, the tomato plants in my yard are getting bigger and fuller. I have so many tomatoes, I have to use them whichever way I can. This tomato chutney is at top of the list.
                Use the 'recipe' as merely a guideline. This is how my mom makes it and so do I. Adjust chilies and jaggery suitable to your taste.


Ingredients-

2-3 green tomatoes
2 green chilies,cut in pieces
1/8 cup sesame seeds
handful of cilantro
salt to taste
jaggery 1 tb spoon
1 tb spoon oil


Method-
Wash tomatoes and quarter them. In a pan, heat oil on medium heat. Add quartered tomatoes and chopped chilies. Fry until tomato skin is slightly blistered (just couple of minutes). Remove from heat and cool to room temperature.
      To make chutney, mix cooled tomato and chilies, cilantro,sesame seeds,salt and jaggery in blender. Pulse until smooth. Taste and adjust the seasonings. Serve with parathas/ rotis/ even a slice of bread.
        You can use cilantro stems for this chutney as well.  The stems have stronger flavor and goes very well with the green tomatoes.

Friday, June 28, 2013

Crème caramel

So simple yet so elegant. Crème caramel is a classic dessert made with caramel and custard. Making custard without eggs seems almost impossible however it is very much achievable. After lot of trials, here is the one.


Ingredients:
For Caramel-
1/4 cup sugar
1 tb spoon water

For 'custard'
1 cup whole milk
2 tb spoon corn starch mixed with 2 tb sp water
1 tb spoon milk powder
1 tb spoon sugar
1/2 tea spoon vanilla extract

Method:
Start with caramel. To make caramel, put sugar and water in a pan and bring mixture to boil. Swirl the pan to avoid burning. Do not stir the caramel, else it will crystallize.Once the caramel starts changing color (golden brown), switch off the heat and remove the pan. Sugar keeps cooking and it will eventually be a dark brown in color. If you keep cooking caramel on the heat until it reaches the beautiful golden color, you will burn it! Pour the caramel into 2 greased ramekins and set aside to cool.
       To make custard, heat the milk just until it reaches below the boiling point. Add corn starch paste, milk powder,sugar and vanilla extract. Stir everything together to mix. Cool slightly. Strain the 'custard' to ensure its smoothness. Pour slightly cooled custard onto set caramels.
       Transfer the ramekins into a deep baking dish. Pour hot tap water until the water reaches half the height of the ramekins. Bake in pre-heated 350 F oven for about 40-50 minutes or just until the custard is set. 
       Refrigerate set custard for at least 4 hours, overnight is even better. To remove custard from the ramekin, run a knife around the edges of ramekin and turn ramekin upside down on the plate. When the custard is on the plate, the caramel at the bottom will pour over the custard making a puddle of caramel into a plate! 
    

Monday, June 10, 2013

Beancurd in disguise

Bean-curd/tofu is a staple in my home. I eat it almost everyday. A very versatile ingredient, so much can be done with it like roasting,pan frying,grilling,baking. But every once in a while, I try to do something different and this is how it turned out!


Ingredients:
grated extra firm tofu 1 and half cups
1 tb spoon minced chillies
1/2 tb spoon each minced ginger and garlic
salt to taste
1 -2 tb spoon chopped cilantro
2 tb spoon semolina flour (use breadcrumbs if available)

Method:
Mix together all the ingredients. Divide the mix in 4 equal balls. Shape each ball into a flat disk (a patty). Shallow fry in a skillet. Serve with coconut chutney.
    Adjust the spice level according to taste.

Sunday, June 2, 2013

Salad for dessert -Pear and blue cheese!

You read it right. Although it may sound weird, it won't disappoint you. When the recipe comes from Ina Garten, there is hardly anything that you don't want to try! This time, I am writing about roasted pear with blue cheese salad. The original recipe calls for arugula, however don't add it and you have a wonderful dessert. Take this from the one who is not a fan of blue cheese!
            I used bosc pears instead of anjou pears, omitted port and adjusted the amount of sugar. I prefer not to peel the pears, you can if you like.


Ingredients:
3-4 medium size bosc pears
3 tb spoons Lemon juice
3 oz blue cheese, crumbled
1/3 cup dried cranberries
1/3 cup walnuts, roasted and chopped
1/4 cup apple cider vinegar
1/8 cup light brown sugar (adjust according to taste)
salt to taste

Method:
Thoroughly wash and slice the pears into quarters.Remove the core and the seeds. Chop each quarter into bite size pieces.Toss pears in lemon juice and arrange them in a single layer in baking dish. In a mixing bowl, mix together blue cheese,cranberries,walnuts. Distribute this mixture over the chopped pears equally. Mix together, apple cider vinegar and brown sugar until sugar is dissolved. Pour the mixture on and around pears and bake in 375 F oven for about 10-15 minutes. Remove from oven, and set aside to cool until warm.
             Sprinkle salt just before serving. Serve warm!

Note: There will be basting liquid left in the baking dish after baking the pears. Serve the basting liquid with the salad!


Thursday, May 23, 2013

Instant mixed vegetable 'pickle'

The only reason I call it a pickle is because, I use ready made pickle spice for this. You can call it relish/chutney or whatever.
       Growing up my mom always made it and I can not remember why I don't make it that often. It is very easy to make and there is not really a recipe. This is a rough guideline.All vegetables are raw and marinated in lemon juice! How bad can it be?!


Ingredients:
1/4 cup cauliflower, raw and cubed (about 1/4 inch piece)
1/4 cup chopped green beans
1/4 cup chopped carrots
1/4 cup green peas
1/8 cup chopped ginger (optional)
1/8 cup fresh turmeric root (optional)
2-3 green chillies, slit length-wise. (make sure not to cut through)
1/3 cup lemon juice
1 tb spoon lemon pickle spice (adjust according to taste)
salt to taste

For tampering:
1 tb spoon oil
1 tea spoon mustered seeds
1/2 tea spoon turmeric powder
1/2 tea spoon asafoetida

Method:
Mix together all chopped vegetables,ginger,turmeric root,lemon juice, chillies,salt and pickling spice and set aside for at least 8 hours. To make the tempering, heat oil, add mustered seeds,asafoetida and turmeric powder and let this cool completely. Add cooled tempering to pickle and mix everything well. Transfer pickle in a glass jar with air-tight lid. It lasts for about a week in refrigerator.

Note:
If you don't have lemon pickle spice (lonache masala), use mixture of 1 tea spoon fenugreek seed powder,1 tea spoon cayenne pepper powder and 1 tea spoon mustered seeds powder. To make fenugreek powder, sauté 1 tea spoon fenugreek seeds in 1/2 tea spoon oil until they turn brown.Cool to room temperature and grind it with mustered seeds to get fine powder.

Sunday, May 12, 2013

Orange marmalade

In all the varieties that are available in jam/jelly/preserves, orange marmalade is 'the one' for me! I don't have any favourites when it comes to store bought one, so making it myself is the only way. It is rather simple to make. Oranges have ton of pectin in them, so no need to buy any.
                  There are many varieties of oranges available in farmers market. Navels being most common of them. Cara-Cara oranges are my favourite. They are sweeter than usual oranges and don't have thick pith. A perfect choice for marmalade.However, if you don't get Cara Cara oranges, make it with regular ones, just adjust the amount of sugar!
                  The marmalade is a bread spread. You won't have a thick jam like consistency when done.


Ingredients:
2 lbs oranges (5 cups when sliced) 
1/2 cup orange zest (use zest of all the oranges)
3 cups water
1/4 cup lemon juice
1 tb spoon lemon zest
2 cups sugar (adjust to taste)
small piece of cheesecloth

Method:
Wash the oranges thoroughly. Zest all the oranges. Remove both ends with thick pith (do not throw it away).Remove any pith/skin left on oranges after zesting and slice oranges into about 1/4 inch thick slices, removing seeds as you go. Stack the slices and cut into the quarters. Transfer quartered orange slices,lemon zest and orange zest, lemon juice and water into a heavy bottom stainless steel pan. In a cheesecloth, take half of end parts with thick pith and make a pouch. Throw this in the mixture along with everything else.  Bring the mixture to boil and let it boil for 7-8 minutes stirring in between. Lower the heat to medium, add sugar and keep cooking until the mixture starts to thicken . It will take about 30-35 minutes. Stir every now and then to prevent burning.
           Meanwhile, place couple of spoons in the freezer to taste if the marmalade is ready. Dip 1 cold spoon in to the hot mixture, remove from mixture and let cool for half  a minute. Draw a line with your finger on the spoon. If the mixture sets up in 2 parts and you can see the line clearly, it is ready. If not keep cooking for few more minutes.
            Remove cheesecloth pouch and throw it away.Cool the marmalade down to room temperature. Pour marmalade into clean jars and seal with the lids. It will last for about a month in the refrigerator.


Wednesday, March 20, 2013

Appe

Mouth watering south Indian delicacy is my favourite. Original recipe is made with just rice and urad dal. However, this recipe came from my mom and contains chana dal too. Addition of spices is totally optional and up to you..


Ingredients:
1/2 cup urad dal
1/2 cup chana dal
1 cup rice
1/2 tea spoon fenugreek seeds
salt to taste
1 green chili, finely chopped
1 tb spoon minced ginger
2 tb spoons chopped cilantro

Method:
Soak together both the dals, rice and fenugreek seeds overnight or at least for 8 hours in 4 cups water. After 8 hours, remove excess water and grind everything in batches to get pourable batter. Keep the batter in a warm place to ferment for another 8 hours. Batter will be double in size.
      Just before making appe, add chili,ginger,cilantro and season with salt. Stir to combine well. You will need 'appe patra' to make these. Heat appe patra with a drop of oil in each hole. Add fermented batter until it reaches half of the sides of the hole. Cover and cook on medium heat. Once cooked, flip appe to get an even golden brown color on both sides.
     Serve with chutney and sambar!

Add chopped onion in batter just before making appe to make it even more tasty!


Wednesday, February 6, 2013

Vegetable pot pie

Vegetable pot pie is so easy to make and it can be made any day of the week! Choose the vegetables in season and you can make numerous variations of the basic recipe. I love to make a pot pie especially on the days when there are no sufficient vegetables available for the meal. Mix them all and you have a nice hot pot pie!
                     It really is simple to put together. You can make a crust in advance and freeze it for up to about a week. So don't scramble everything at once, just make a vegetable filling,put it in individual pot,cover with pastry and bake for about 25-30 minutes and you are done. A nice green salad on the side is definitely a plus.
                    If you don't have time to make individual pots, make one big pot or even a galette (just  a fancy term for a free form pie). A galette , is a dessert usually made with fruit filling but works just fine with this filling as well!


Galette!


Ingredients:
1 and half cups whole wheat flour
4 tb spoon butter cold,diced into cubes
2 tb thick yoghurt
1 tea spoon baking powder
1/4 tea spoon baking soda
pinch of salt
pepper to taste (optional)
1/4 cup cold water

filling-
1 medium size green bell pepper cut into cubes
2 medium size potatoes cut into cubes
1 onion chopped
1 tb spoon garlic chopped
1/2 medium size carrot cubed
1 small broccoli chopped (roughly the same size as other veggies)
2 tb spoon olive oil
2 tb spoon all purpose flour
3/4 cup milk (whole)
1-2 tb spoon parmigiano reggiano

Method:
To make pastry, add flour,salt,pepper,baking powder,baking soda into food processor and pulse a few times. Add cold butter and pulse until you get crumbly consistency. Add yoghurt and pulse again. Add cold water (1 table spoon at a time) to form a dough. Transfer the dough onto a plate and knead a few times until it comes together. Wrap it in plastic wrap and keep aside.
             For the filling, heat olive oil in a pan. Add garlic and onion and sauté until fragrant. Add carrots,bell pepper,broccoli and potato and cook everything for 3-4 minutes or just until everything starts to soften. Sprinkle all purpose flour on vegetables, stir to coat and cook for 1-2 minutes. Add milk slowly and whisk everything with a whisk until slightly thickened (don't go too far with the thickening else you will end up with paste). Remove from heat ,add parmigiano reggiano cheese and stir to combine. Cool slightly before starting to build pot pie.
           To build a pot pie, put about 1/4 of a vegetable mixture into a small casserole. Divide the pastry in 4 equal size balls. Roll each ball to fit the baking pot,prick it with a fork. Place dough over filling and tuck into the edges of pot. Slit a small hole in the middle of the pot pie to allow steam to escape. Brush the dough with a mixture of 1 tb spoon oil and 1 tb spoon milk to give pie a golden brown colour. Bake in 350 F pre-heated oven for about 25-30 minutes or until golden brown. Serve hot.
           To make a galette, divide pastry in 2 equal size balls. Roll each ball to form a circle of about 1/8 inch thickness and prick it with a fork. Place half of the filling in the middle of rolled pastry and fold remaining pastry over filling (as shown in the picture). Do not cover the entire filling with pastry, keep an opening to allow steam to escape. Place galette on a baking tray, brush with oil+milk mixture and bake in 350 F oven for 25-30 minutes.

Saturday, January 12, 2013

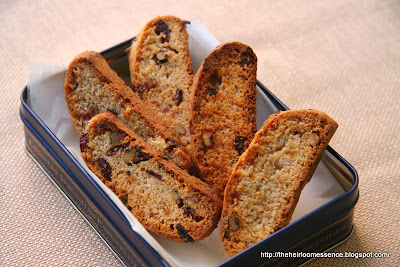
Biscotti

Holiday season brings out the 'baker' in me. A big reason for that is with so many people visiting, I can bake in big batches and don't have to worry about 1/4 cup and tablespoons measurements (which I normally use when baking for 2).
                     Biscotti is unique in the sense that it is a twice baked cookie. An added advantage is that it is vegan! Once I found this recipe, I just had to try it and am glad that I did.

Thank you for photo Evolving Tastes!


Ingredients:
1 and 1/2 cups all purpose flour
1 tea spoon baking powder
1/2 cup sugar
1/4 tea spoon salt
1 tea spoon vanilla extract
1 tea spoon ground cinnamon
1/2 tea spoon ground cloves
2 tb spoon oil
1/4 cup apple sauce
1 cup chopped dried fruits and nuts ( cranberry, crystallized ginger,apricots,pecans and walnuts soaked in 1/3 cup orange juice,pinch of salt and 1 tb spoon sugar for at-least 48 hours)
1 tb spoon each orange and lemon zest (optional but tastes so good!)

Method:
Sieve together flour,baking powder,salt,ground cinnamon,ground cloves and set aside. In a mixing bowl, mix oil and sugar and stir well until combined. Add apple sauce,orange and lemon zest and vanilla extract and mix well. Add dry mixture and knead lightly until a loose dough comes together. Add fruit and nut mixture along with the juice and knead lightly again to thoroughly combine and form a loose dough. (Do not over-work the dough). Rest the dough for 15 minutes. Pre-heat oven on 350F. Divide dough in 2 equal size balls and form a log of about 1 inch thickness (flour your hands before doing this) out of each ball. Place the logs on oiled baking tray and bake for 25-30 minutes or until firm to touch.Oven timings may vary from oven to oven ,so  keep an eye while the logs bake. Once they feel firm, remove from oven and let them cool for 10 minutes. Turn the oven temperature to 300F. Cut each log diagonally into 1/2 inch thick pieces using serrated knife. Arrange these pieces in a single layer (cut side down) and bake for 5-6 minutes. Again remove from oven, flip the pieces and bake again for another 5-6 minutes. Remove from oven, transfer to cooling rack and cool to room temperature. This will give a crunchy biscotti , if you want an extra crunch, bake for another 2-3 minutes on each side.
           Store in an air tight container at room temperature. They will last for about a week.

Note: If after adding the fruit and nut mixture along with orange juice dough is dry, add more apple sauce 1 table spoon at a time. In any case, you will not need more than 1/4 cup extra apple sauce.


Saturday, January 5, 2013

Chocolate fudge cake

Chocolate is my weak point. I am a huge fan of dark chocolate and especially dark chocolate cake! This delivers on promise. I am not a fan of icing on cake , however this 'fudge' like icing is silky,smooth and not buttery but chocolaty! Perfect for any occasion!


Ingredients:

For cake
1 cup all purpose flour
1 tea sp baking powder
1/2 tea sp baking soda
1/4 tea sp salt
2 oz unsweetened chocolate melted with 1 tb sp butter and 1 tb sp water
1 tea sp instant coffee powder diluted in 1/4 cup hot water
1/4 cup yogurt
1/2 tea sp vanilla
1 tb oil
1/4 cup brown sugar
1/8 cup granulated sugar

For icing
1 oz chocolate (unsweetened)
1/4 cup milk
1/4 cup milk powder
1/4 tea sp vanilla extract
2 tb spoons sugar
1 tb spoon honey


Method:
Sieve together all purpose flour,baking powder,baking soda and salt and keep aside. Whisk together oil,sugar,brown sugar,yogurt and vanilla extract. Add diluted coffee and cooled melted chocolate mixture and whisk everything together. Add half of dry flour mixture and gently fold it in with a spatula. Add remaining mixture and fold again until the flour is just combined. Do not over-mix the batter, else you will end up with a tough cake. Transfer batter into a 6 inch round buttered and floured pan and bake on 350 F for 25-30 minutes. Every oven is different, so you may want to check the cake after 20-22 minutes. Once baked, cool completely before frosting.
           To make frosting, mix together chocolate,milk, and vanilla extract,sugar and melt everything together on a low heat. Once melted, remove from heat and add milk powder. Whisk everything together. Add honey at the end ; it ensures that the frosting will glisten! Cool to room temperature.         Coat the entire cake with fudge frosting using knife or spatula. Cut and serve at room temperature.